This is an incredibly common and frustrating issue! The connection error between an iPhone Personal Hotspot and Windows 10 is usually caused by a conflict in network settings or an outdated driver.
Here is a comprehensive troubleshooting guide, starting with the simplest and most effective fixes.
1. Quick Fixes (The 90% Solution)
Before diving into complex settings, try these simple steps in order:
1.1 Cycle the Hotspot and Wi-Fi
- On your iPhone: Go to Settings > Personal Hotspot.
- Toggle Allow Others to Join OFF, wait 10 seconds, and then toggle it ON again.
- Crucially: Stay on the Personal Hotspot screen on your iPhone while you attempt to connect with your Windows PC. The hotspot can become hidden if you leave this screen.
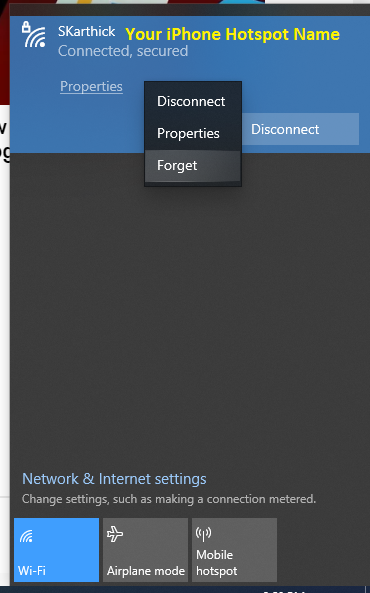
1.2 Forget the Network
The saved network profile on your PC might be corrupted.
- On your Windows 10 PC: Go to Settings > Network & Internet > Wi-Fi.
- Click Manage known networks.
- Find your iPhone’s hotspot name, click on it, and select Forget.
- Now, try connecting again and re-enter the password.
1.3 Restart Both Devices
A simple restart can clear temporary glitches on both the network adapter and the phone’s mobile data connection.
- Restart your iPhone.1
- Restart your Windows 10 PC.2
- Turn on the Hotspot and try connecting again.3
2. Advanced iPhone Settings (Compatibility)
If the quick fixes don’t work, the issue may be related to Wi-Fi frequency bands.
2.1 Maximize Compatibility
Newer iPhones often broadcast the hotspot on the faster 5 GHz band, which some older Windows 10 Wi-Fi adapters can’t detect or connect to reliably.
- On your iPhone: Go to Settings > Personal Hotspot.
- Find the Maximize Compatibility option (available on iPhone 12 models and later).4
- Toggle this switch ON. This forces the hotspot to use the more universally compatible 2.4 GHz band.
3. Windows 10 Network Reset
These steps will reset your PC’s network components, clearing out any conflicting configuration.
3.1 Run the Network Troubleshooter
- On your Windows 10 PC: Go to Settings > Network & Internet > Status.
- Scroll down and click Network troubleshooter.
- Follow the on-screen prompts.
3.2 Reset Network Commands
This manually resets your PC’s network stack and is often the most effective Windows-side fix.
- Search for Command Prompt in the Windows Start menu.
- Right-click on it and select Run as administrator.
- Execute the following commands one at a time, pressing Enter after each one:
netsh winsock reset netsh int ip reset ipconfig /release ipconfig /renew ipconfig /flushdns - Restart your computer and try connecting again.
4. USB Tethering (The Most Reliable Connection)
If Wi-Fi fails, connecting via a cable is the most stable and reliable way to use your iPhone’s hotspot.
4.1 Install/Update Apple Drivers (via iTunes or Apple Devices)
Windows needs the proper Apple network drivers to recognize the iPhone as a network source via USB.
- Install the latest version of iTunes or the Apple Devices app from the Microsoft Store on your Windows PC. Installing this bundle includes all necessary drivers.
- On your iPhone: Go to Settings > Personal Hotspot and leave this screen open.
- Connect your iPhone to your PC using a genuine Apple Lightning/USB-C cable. (Generic cables often only support charging, not data/tethering).
- If prompted on the iPhone, tap Trust and enter your passcode.
- Your Windows PC should automatically detect the connection as a wired network (usually labeled “Ethernet” or “Apple Mobile Device Ethernet”).
4.2 Check Device Manager (USB Method)
- Press Windows Key + X and select Device Manager.
- Expand the Network adapters section.5
- Look for an entry like Apple Mobile Device Ethernet.
- If it has a yellow exclamation mark, right-click and select Update driver > Search automatically for updated driver software. If the driver update fails, try uninstalling the device and then unplugging/replugging the phone.
If still fails, – Run Windows10 update, – Run iPhone iOS software – Still issues? Contact VVCARES.COM, WE MAY GUIDE YOU FREE..